The Guide to amplifying Customer Service with Voice Channels in Dynamics 365
Alright, let’s dive into the Dynamics 365 Customer Service world! Picture this: representatives in the frontlines can pick up the phone and have a good old chat with customers using the voice channel. While chat, SMS, and social media are the hip new ways for customers to reach out, never underestimate the power of a good old-fashioned phone call. Now, let’s talk about Omnichannel for Customer Service – it’s like a supercharged toolkit for agents. They can make and take public switched telephone network (PSTN) calls right from within Dynamics 365, no fuss. And here’s the cool part: the voice channel comes with some seriously nifty AI features. Think real-time call transcriptions, getting a vibe on customer sentiment, and AI-backed suggestions that make the agents’ lives smoother. Oh, and there’s more! Omnichannel for Customer Service brings in a ton of insights and analytics, including some fancy AI-driven topic sorting and in-depth call insights. It’s like having a customer service crystal ball!
Prerequisites
You must have an active subscription to either Dynamics 365 Customer Service Voice Channel Add-on or Dynamics 365 Customer Service Digital Messaging and Voice Add-on.
Install the voice channel within Dynamics 365
- Follow the steps in the “Set up Omnichannel for Customer Service” guide.
- In the Voice section, switch the “Add voice” toggle to “Yes” to enable the voice channel. Make sure to select the “Voice and SMS Terms” checkbox.
- Save your changes and close the window.
Connect using a new Azure Communication resource
Navigate to the Customer Service Admin Center in Dynamics 365 and follow these steps:
- From the site map, select “Channels” in the “Customer Support” section.
- Click on “Manage” for Phone numbers.
- Select “Get started”. The Connect to Azure Communication Services dialogue box will appear.
- Choose “create new resource” and enter the necessary details:
-
- Azure subscription: Select a subscription from the dropdown list.
- Azure resource group: Select an existing resource group or create a new one with a unique name within your subscription.
- Resource name: Enter a name for the resource that contains only letters, numbers, and hyphens.
- Click “Deploy” to create and deploy your new Azure resource connected to Azure Communication Services.
Once you have successfully created this new resource, you can use it to acquire phone numbers for your organization and enable call recording and SMS services or bring your carrier via direct routing. Your preferred option should be “bring your own carrier” if you are an enterprise customer.
Configure Direct Routing
Connect your Service Provider/SIP trunk via Direct Routing.
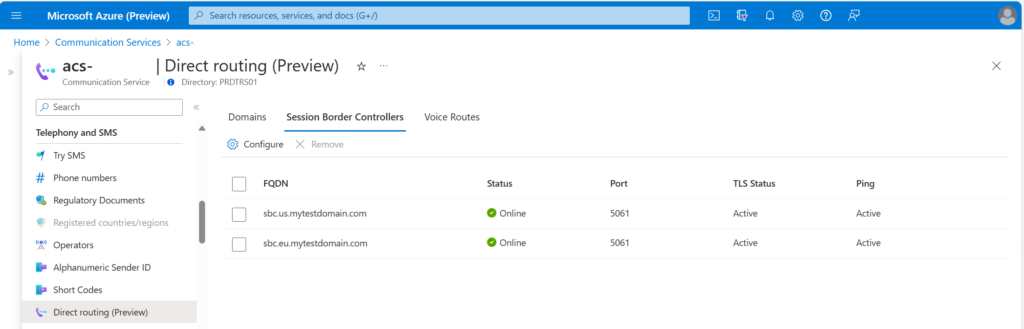
- Open your Azure Communication Ressource in the Azure Portal and open “Direct Routing” under “Telefony and SMS”
- Open the dialogue “add domain” to add the Carrier / SBC Domain to the configuration and to verify it.
- When verified, go to the “Session Border Controllers” Tab and add your Service Provider SBCs/SIP trunk service.
- Configure your Voice Routes according to your needs.
Configure Phone numbers
In Dynamics 365, navigate to the Customer Service Admin Center and follow these steps:
- In the site map, choose Channels under Customer Support. The Channels page will appear.
- Click Manage for Phone Numbers.
- Select Advanced from the menu.
- Choose Add Number for “bring your own number via Azure Direct Routing (preview)”.
In the Add Your Own Phone Number dialogue, provide the following information:
- Phone Number: Enter the phone number you own and have configured in your SBC.
- Carrier: Specify the carrier to which the phone number belongs. You can create a new record if the carrier doesn’t exist yet.
- Country/Region: Choose the country or region with which the phone number is associated.
- Number Type: Select whether it is a toll-free or local phone number.
- Calling Plans: Determine whether you can make or receive calls on the phone number.
Please note that SMS is not supported with direct routing.
Select Add number.
The new phone number will be displayed in the Phone numbers list and is ready for setup. You can now connect it to a voice workstream, configure outbound calling, or assign it to an agent.
Conclusion
Rolling out voice channels within Dynamics 365 Customer Service takes your customer communication game up a notch and gives agent productivity a hearty boost. By simply following the path we’ve laid out in this guide, you’ll be breezing through setting up and fine-tuning voice channels, syncing up with Azure Communication Services, and expertly managing those all-important phone digits for your organization. This harmonious blend enables you to harness the potency of AI-driven perks and analytics, in turn amping up the customer support journey and slickening your operational flow.
If you’re looking for more guidance or assistance, don’t hesitate to reach out to us. We’re here to provide the support you need to navigate this journey seamlessly.
